Team members
In the UID2 Portal, on the Team Members page, users with the Admin role can perform all activities relating to configuring individuals who you want to authorize for access to your account, including the following:
- Add a team member
- Set the primary contact
- Resend an invitation to a team member
- Edit information for a team member
- Remove a team member
Accessing the team members page
To access the Team Members page, go to the top right of the UID2 Portal user interface where your name is displayed. Click the down arrow and choose Manage Team Members.
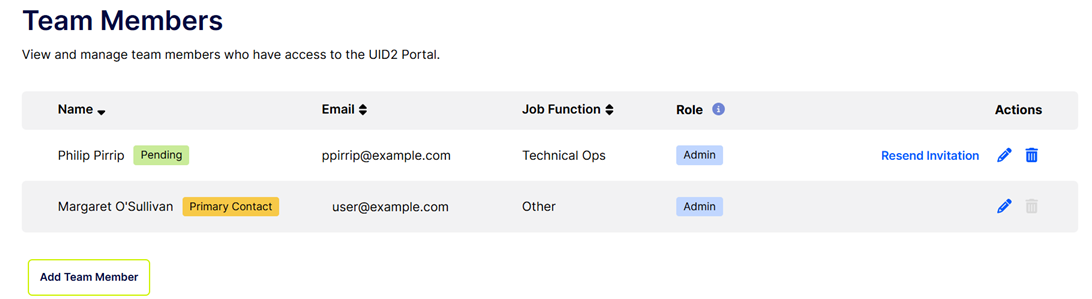
For each team member, the following information is displayed:
-
Name
If the user has been invited but has not yet accepted, there is a Pending tag after the person's name.
-
Email
-
Job Function
-
Role
-
Actions:
- Available for all:
 (Edit) and
  (Delete).
 - If the user has been invited but has not yet accepted, a Resend Invitation link is also available.
- Available for all:
For the one team member who is the primary contact, a tag is displayed after the team member's name.
For an illustration, see Resend an invitation to a team member.
User roles
Each team member has one of the roles shown in the following table.
| Role | Actions |
|---|---|
| Admin | Users with the Admin role can perform all activities related to UID2 participation, as summarized in the UID2 Portal overview, for the current participant organization. |
| Operations | Users with the Operations role can perform most of the same actions as Admin users. However, there are some limitations:
|
User roles can only be modified by users with the Admin role. For details, see Edit information for a team member.
Add a team member
To add a team member, complete the following steps:
-
Log in to your UID2 Portal account.
-
At the top right, click the down arrow and choose Manage Team Members.
-
Click Add Team Member.
-
Enter the first name, last name, email, job function, and role. For information on the roles, see User roles.
-
Optional: To make this person the primary contact, check the Set as primary contact box. The Admin role is required for the primary contact. For details, see Set the primary contact.
-
Click Save Team Member.
The team member is added to the list, with Pending status, and an invitation email is sent to the invited person.
The same team member can be added to more than one participant. Team members who belong to multiple participants can switch between participants, as shown in UID2 Portal structure.
Set the primary contact
Each team has a primary contact who is the main point of contact for communications relating to UID2.
Here's some key information about the primary contact:
- By default, when the first team member is added, that person becomes the primary contact.
- The primary contact must have the Admin role.
- To remove the current primary contact, or change that person's role to Operations, you must first specify a different team member to be the primary contact.
- On the Team Members list, a tag is displayed after the primary contact's name. For an illustration, see Resend an invitation to a team member.
To set a primary contact, complete the following steps:
-
Log in to your UID2 Portal account.
-
At the top right, click the down arrow and choose Manage Team Members.
-
Do one of the following:
- To set an existing team member as the primary contact: Find that team member on the list and click (the Edit icon). Check Set as primary contact, update the role to Admin if needed, and save the changes.
- To add a new team member as the primary contact: Follow the instructions in Add a team member. Check Set as primary contact, set the role to Admin, and save the changes.
- To set an existing team member as the primary contact: Find that team member on the list and click
Resend an invitation to a team member
If you added a team member, you might need to resend the invitation. For example, perhaps the team member didn't receive the invitation or accidentally deleted it, or the invitation has expired.
If the user has been invited but has not yet accepted, the Team Members list includes the following additional information, as shown in the illustration:
- A Pending label after the person's name.
- A Resend Invitation link.
To re-send the invitation for a team member, complete the following steps:
-
Log in to your UID2 Portal account.
-
At the top right, click the down arrow and choose Manage Team Members.
-
Find the team member on the list and then, in the Actions column, click Resend Invitation.
The status updates to Invitation Sent, and a new invitation email is sent.
The Resend Invitation link only appears if the user has been invited, but has not yet accepted.
Edit information for a team member
Notes re role:
- Users with the Admin role can update any of these values, for any team member in their participant organization.
- Users with the Operations role can view the Team Members page, but cannot change the information.
To edit information for a team member, complete the following steps:
-
Log in to your UID2 Portal account.
-
At the top right, click the down arrow and choose Manage Team Members.
-
Find the team member on the list and then, in the Actions column, click
(the Edit icon). -
Update any of these values:
- First Name
- Last Name
- Job Function
- Role: For information about roles, see User roles.
Note: You cannot update the email for an existing team member. If you need to change the email, add a new team member using the new email. This ensures that the email verification process is correctly followed. In this scenario, remember to also delete the existing entry with the old email address.
-
Save the changes.
Remove a team member
To remove someone from the team, follow these steps:
-
Log in to your UID2 Portal account.
-
At the top right, click the down arrow and choose Manage Team Members.
-
Find the team member on the list and then, in the Actions column, click
(the Delete icon). -
At the confirmation message, click Remove Team Member.
The team member is removed from the team.
Log in for the first time as a team member
If someone added you as a new team member, we send you a confirmation email so that you can validate your address. Follow these steps:
- Click in the email to accept the invitation.
- Click through to update your password from the initial default.
- Log in to the UID2 Portal using your email and your new password. This confirms your account.
- On first login, review and accept the UID2 Sharing Portal Terms of Service.