Private Operator for Azure integration guide
The UID2 Operator is the API server in the UID2 ecosystem. For details, see The UID2 Operator.
This guide provides information for setting up the UID2 Operator Service as a Private Operator in an instance of Confidential Containers, a confidential computing option from Microsoft Azure. Confidential Containers instances run in a hardware-backed Trusted Execution Environment (TEE) that provides intrinsic capabilities such as data integrity, data confidentiality, and code integrity.
When the Docker container for the UID2 Operator Confidential Containers instance starts up, it completes the attestation process that allows the UID2 Core Service to verify the authenticity of the Operator Service and the enclave environment that the Operator Service is running in.
When the attestation is successful, the UID2 Core Service provides seed information such as salts and keys to bootstrap the UID2 Operator in the secure UID2 Operator Confidential Containers instance.
UID2 Private Operator for Azure is not supported in these areas: Europe, China.
Operator version
The latest ZIP file is linked in the Azure Download column in the following table.
| Version name | Version number | Release notes | Azure download | Date | Deprecation date |
|---|---|---|---|---|---|
| H1 2026 | v5.70.159 | v5.70.159 | azure-cc-deployment-files-5.70.159-r0.zip | June 23, 2026 | June 30, 2027 |
For information about supported versions and deprecation dates, see Private Operator versions.
Private Operator upgrade policy
To maintain security and operational integrity, outdated operator versions will be disabled after 12 months, which may cause affected deployments to shut down or fail to start. Upgrading ensures the use of the latest security and feature enhancements. We recommend upgrading proactively to avoid disruptions.
For critical security or operational issues, or where contract terms apply, we reserve the right to enforce tighter upgrade timelines for Private Operators.
Prerequisites
Before deploying the UID2 Private Operator for Azure, complete these prerequisite steps:
Set up UID2 Operator account
Ask your UID2 contact to register your organization as a UID2 Operator. If you're not sure who to ask, see Contact info.
When the registration process is complete, you'll receive an operator key, exclusive to you, that identifies you with the UID2 service as a Private Operator. During configuration, use this as the value for OPERATOR_KEY. This value is both your unique identifier and a password; store it securely and do not share it.
You'll receive a separate operator key for each deployment environment.
Install Azure CLI
Install the Azure command-line interface. For details, see How to install the Azure CLI in the Azure documentation.
Get the required Azure permissions
You'll need to have subscription owner permission so that you can create a resource group.
When that's done, you only need contributor permission on the resource group level for that resource.
For details, see Azure roles in the Azure documentation.
When all prerequisite steps are complete, you're ready to deploy the UID2 Private Operator. See Deployment.
Preparing DII for processing
It's critical that the input data, which you are converting to UID2, is in an acceptable format. If it isn't, you won't get the expected results. For example, you must normalize phone numbers to include the country code, as explained in Phone number normalization.
For details, see Preparing emails and phone numbers for processing.
To validate the full token generation pipeline end to end, confirming that tokens generated from your normalized, hashed, and encoded values are correct, use the UID2 Token Validator.
Deployment environments
The following environments are available. As a best practice, we recommend that you test and verify your implementation in the integration environment before deploying in the production environment.
You'll receive separate {OPERATOR_KEY} values for each environment. Be sure to use the correct key for the environment you're using. The deployment artifacts and the process flow are the same for both environments.
| Environment | Details |
|---|---|
Integration (integ) | For testing only. Debug mode is available in the integration environment. |
Production (prod) | For managing production traffic. |
Deployment
To deploy a new UID2 Private Operator for Azure, you'll need to complete the following high-level steps:
- Download ZIP file and extract files
- Create resource group
- Complete key vault and managed identity setup
- Set up the VPC network
- Complete the UID2 Private Operator setup
- Set up the Gateway Load Balancer
Download ZIP file and extract files
The first step is to get set up with the deployment files you'll need:
-
Download the ZIP file linked in the following table, Azure Download column, for the latest version.
-
Unzip the ZIP file to extract the following files, needed for the deployment:
vault.jsonandvault.parameters.jsonvnet.jsonandvnet.parameters.jsonoperator.jsonandoperator.parameters.jsongateway.jsonandgateway.parameters.json
Create resource group
In Azure, run the following command to create a resource group to run the UID2 operator:
az group create --name {RESOURCE_GROUP_NAME} --location {LOCATION}
All the resources are provisioned later under the name you provide as the {RESOURCE_GROUP_NAME} value.
There are some limitations with regard to location:
-
UID2 Private Operator for Azure is not supported in these areas: Europe, China.
-
For Azure virtual network deployment availability, check Linux container groups in the Azure documentation to confirm the availability of Confidential Containers regional support.
-
To get the alias for the location, run the following command:
az account list-locations -o table
Complete key vault and managed identity setup
The next step is to set up a key vault and save the operator key in it.
When you've created the key vault, you can create a managed identity and grant it permission to access the key vault.
Later Azure Container Instances (ACIs) will launch as this identity.
Follow these steps:
-
Update the
vault.parameters.jsonfile with the following required values:Parameter Description vaultNameThe name of the key vault for hosting the operator key secret. The name you choose must be globally unique. operatorKeyValueThe OPERATOR_KEYsecret value, which you received from the UID team as part of account setup (see Set up UID2 Operator account). This value is unique to you, and acts as a password: keep it secure and secret. -
(Optional) If you don't want to accept the defaults, update the
vault.parameters.jsonfile with the following values. These parameters have default values and in most cases you won't need to make any updates.Parameter Description operatorIdentifierThe name of the managed identity that will launch the container.
Default:uid-operator.operatorKeyNameThe operator key secret name.
Default:operator-key. -
Run the following command to trigger the deployment:
az deployment group create --name vault --resource-group {RESOURCE_GROUP_NAME} --parameters vault.parameters.json --template-file vault.json
Set up the VPC network
The next step is to set up the VPC network.
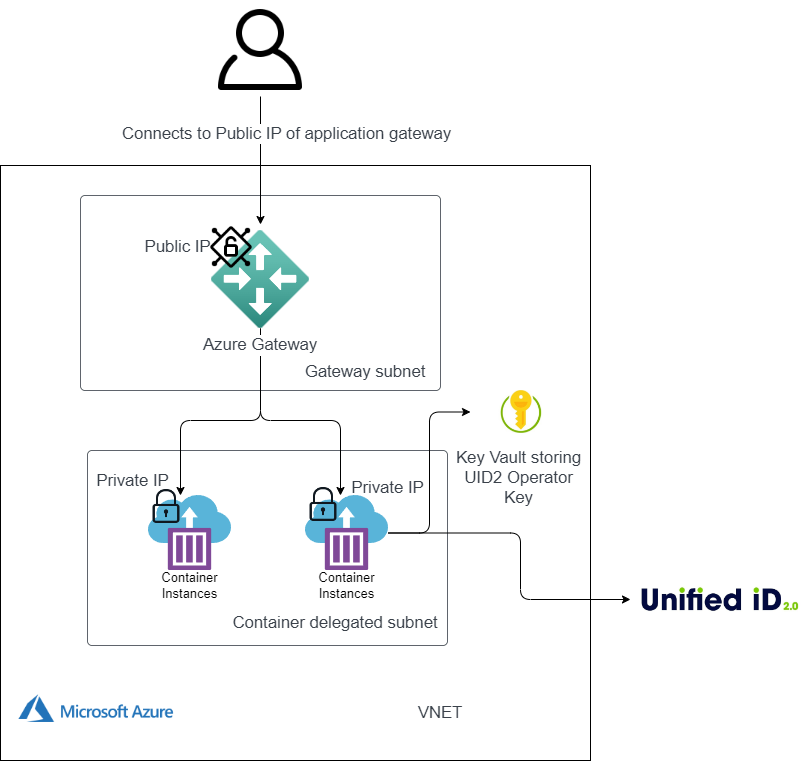
The following diagram illustrates the virtual private cloud that hosts a UID2 Private Operator in Microsoft Azure.
Follow these steps:
-
(Optional) If you don't want to accept the defaults, update the
vnet.parameters.jsonfile with the following values. These parameters have default values and in most cases you won't need to make any updates.Parameter Description vnetNameThe virtual network name.
Default:unified-id-networkcomputeSubnetNameThe name of the subnet that runs the UID2 Operator.
Default:unified-id-subnet-operatorsgatewaySubnetNameThe name of the subnet that runs the UID2 Gateway.
Default:unified-id-subnet-gatewayVnetAddressPrefixThe vnet address prefix.
Default:10.0.0.0/20computeSubnetPrefixThe vnet address prefix of the subnet that is delegated to run the UID2 Operator.
Default:10.0.0.0/24gatewaySubnetPrefixThe vnet address prefix of the subnet that runs the UID2 Gateway.
Default:10.0.1.0/28 -
Run the following command to trigger the deployment:
az deployment group create --name vnet --resource-group {RESOURCE_GROUP_NAME} --parameters vnet.parameters.json --template-file vnet.json
Complete the UID2 Private Operator setup
The next step is to bring up multiple Azure Container Instances (ACIs) in the VPC subnetwork that you created.
Follow these steps:
-
Update the
operator.parameters.jsonfile with the following required values:Parameter Description vaultNameThe name of the key vault for hosting the operator key secret. The value must match the name you created in Complete key vault and managed identity setup. deploymentEnvironmentIndicates the environment you're deploying to: integorprod. For details, see Deployment environments. -
(Optional) If you don't want to accept the defaults, update the
operator.parameters.jsonfile with the following values. These parameters have default values and in most cases you won't need to make any updates.Parameter Description operatorKeyNameThe operator key secret name. The value must match the value specified in Complete key vault and managed identity setup. If you accepted the default, the value is operator-key.operatorIdentifierThe name of the managed identity that will launch the container. The value must match the value specified in Complete key vault and managed identity setup. If you accepted the default, the value is uid-operator.vnetNameThe virtual network name. The value must match the value specified in Set up the VPC network. If you accepted the default, the value is unified-id-network.computeSubnetNameThe name of the subnet that will run the Private Operator. The value must match the value specified in Set up the VPC network. If you accepted the default, the value is unified-id-subnet-operators.countThe count for the number of instances you want to bring up. The default is 2. -
Run the following command to deploy the ACIs:
az deployment group create --name operator --resource-group {RESOURCE_GROUP_NAME} --parameters operator.parameters.json --template-file operator.json -
Get the IP addresses of the ACI instances you created by running the following command:
az deployment group show -g {RESOURCE_GROUP_NAME} -n operator --query properties.outputsThe output should look something like the following:
{ "ipAddress": { "type": "Array", "value": [ "10.0.0.5", "10.0.0.4" ] } }
Set up the Gateway Load Balancer
The next step is to set up the Gateway Load Balancer, which takes the private IP addresses of the ACIs you created and uses them as a backend pool.
Follow these steps:
-
Update the
gateway.parameters.jsonfile with the following required value:Parameter Description containerGroupIPsThe IP addresses of the ACI instances you created—the values output as a result of Complete the UID2 Private Operator setup Step 4. For example, the updated file might look something like the following:
"containerGroupIPs":{
  "value":[
    "10.0.0.5",
    "10.0.0.4"
  ]
} -
(Optional) If you don't want to accept the defaults, update the
gateway.parameters.jsonfile with the following values. These parameters have default values and in most cases you won't need to make any updates.Parameter Description vnetNameThe virtual network name. The value must match the value specified in Set up the VPC network. If you accepted the default, the value is unified-id-network.gatewaySubnetNameThe name of the subnet that runs the UID2 Gateway. The value must match the value specified in Set up the VPC network. If you accepted the default, the value is unified-id-subnet-gateway. -
Run the following command:
az deployment group create --name gateway --resource-group {RESOURCE_GROUP_NAME} --parameters gateway.parameters.json --template-file gateway.json -
Get the public IP address of the Gateway Load Balancer by running the following command:
az deployment group show -g {RESOURCE_GROUP_NAME} -n gateway --query properties.outputsThe output should look something like the following:
{ "gatewayIP": { "type": "String", "value": "20.163.172.56" } }
If you update the container, the Azure backend pool is not automatically updated with the IP address for the new container. For solutions, see Automate infrastructure reconfiguration by using Azure in the Azure documentation.
This example deploys a Gateway Load Balancer with HTTP. We strongly recommend you set up SSL. For instructions, see Tutorial: Configure an Application Gateway with TLS termination using the Azure portal in the Azure documentation.
Running the health check
Call the health check endpoint to test the health of your implementation.
Running the health check is the same for the integration and production environments, except for the endpoints.
Follow these steps:
-
Get the public IP address for the Gateway Load Balancer—the value output as a result of Set up the Gateway Load Balancer Step 4.
-
To test operator status, in your browser, go to the health check endpoint:
http://{LB_IP}/ops/healthcheck.An HTTP 200 with a response body of
OKindicates healthy status.
Private Operator attestation failure
When a Private Operator fails to attest with the Core service, one of the following actions happens:
- HTTP 401 response. The Private Operator terminates itself immediately.
- Likely Causes: Operator key revoked or incorrect.
- Any other non-200 response code. The Private Operator continues to function for 12 hours. If the issue is not resolved in this time frame, it terminates itself.
- Likely Causes: Core service issues, network issues.
Private Operator hosts must have infrastructure in place to handle alerting and restarting operators in the case of an error.
Scraping metrics
The Private Operator for Azure exposes Prometheus-formatted metrics on port 9080 through the /metrics endpoint. You can use a Prometheus-compatible scraper to collect and aggregate these metrics for your own needs.
The scraper must have access to the VNet that the Private Operator is running in. We do not recommend giving the load balancer access to the /metrics endpoint.
Network security group policy
To avoid passing certificates associated with your domain into the enclave, only inbound HTTP is allowed. Inbound HTTPS is not allowed. This also avoids the extra cost of another secure layer in a network that's already private and internal to your organization.
The following table provides information about supported protocols.
| Port number | Direction | Protocol | Description |
|---|---|---|---|
| 80 | Inbound | HTTP | Serves all UID2 APIs, including the health check endpoint /ops/healthcheck.When everything is up and running, the endpoint returns HTTP 200 with a response body of OK. For details, see Running the health check. |
| 9080 | Inbound | HTTP | Serves Prometheus metrics (/metrics). For details, see Scraping metrics. |
| 443 | Outbound | HTTPS | Calls the UID2 Core Service and AWS S3, to download files for opt-out data and key store. |
If your environment restricts outbound network traffic, you must allow outbound access to the destinations listed in Private Operator network egress.
Upgrading
When a new version of UID2 Azure Confidential Containers is released, Private Operators receive an email notification of the update, with a new release link. There is a window of time for upgrade, after which the older version is deactivated and is no longer supported.
To upgrade, complete the following steps:
-
Follow the instructions in Download ZIP file and extract files to download the deployment file for the new version and then unzip it.
-
Follow the instructions in Complete the UID2 Private Operator setup, using the new files, to deploy ACIs with new versions.
-
Follow the instructions in Set up the Gateway Load Balancer to add the new ACIs to the backend pool.
-
Check the health of the new ACIs and make sure the status is healthy, as shown in the following example:
az network application-gateway show-backend-health --resource-group {RESOURCE_GROUP_NAME} --name uid-operator-gateway -
Clean up old ACIs from the Gateway Load Balancer: Follow the instructions in Set up the Gateway Load Balancer to remove the old ACIs from the backend pool.
-
Shut down old ACIs by running the following command:
for i in {0..COUNT}; az container delete --name uid-operator-OLD-VERSION-$i --resource-group {RESOURCE_GROUP} --yes
Keeping the operator key secure
Here are some guidelines for keeping your operator key secure:
- When you receive your operator key, store it in a secure location.
- Keep track of all places where the key is used, so that if you need to rotate it you can do so quickly.
- Establish a process for replacing the existing value with a new one if the key is compromised.
- Rotate it on a regular cadence—for example, yearly—to help reduce the risk of the key being compromised.
UID2 Operator error codes
The following sections list error codes that might occur during a Private Operator's startup or runtime.
Error codes for Private Operator issues are applicable only to release v5.49.7 and later.
Startup errors
The following errors might occur during operator startup:
| Error code | Issue | Steps to resolve |
|---|---|---|
| E02 | OperatorKeyNotFoundError | Make sure that the secret vault and secret name that store the operator key are correctly configured. Make sure they are set as VAULT_NAME and OPERATOR_KEY_SECRET_NAME. |
| E03 | ConfigurationMissingError | Required attributes are missing in the configuration. Refer to the logs for details and update the missing attributes before running the Azure operator. |
| E04 | ConfigurationValueError | A configuration value is invalid. Verify that the configuration values align with the required format and environment. Note: debug_mode = true is allowed only in the integ environment. Check the logs for more details. |
| E05 | OperatorKeyValidationError | Ensure the operator key is correct for the environment and matches the one provided to you. |
| E06 | UID2ServicesUnreachableError | Allow UID2 core and opt-out service IP addresses in the egress firewall. For IP addresses and DNS details, refer to the logs. |
| E08 | OperatorKeyPermissionError | The managed identity (specified via the operatorIdentifier parameter) that launches the container must have access to the key vault where the operator key is stored. The value of operatorIdentifier must be identical across all configuration JSON files. |
Runtime errors
The following errors might occur during operator runtime:
| Error Code | Issue | How to Identify in Logs | Steps to Resolve |
|---|---|---|---|
| E12 | Data Download Failure | Look for log messages containing E12: Data Download Failure or Failed to load errors from RotatingStoreVerticle. These messages include HTTP status codes (for example, HTTP response code 403) or exception types (for example, exception: IOException). | Check the HTTP status code or exception in the error message and resolve accordingly: 404 errors: Verify that the operator key is valid for the environment. 403 errors: Verify that the operator key and credentials are correct. Timeout errors: Verify network connectivity, check that firewall/security group settings allow outbound HTTPS (port 443), and ensure that the UID2 service endpoints are accessible. 500/503 errors: This code indicates a temporary UID2 service issue. Retry, and if the error persists contact UID2 support. |