AWS Entity Resolution integration guide
AWS Entity Resolution is an identity resolution product from Amazon Web Services that allows AWS customers to integrate with the UID2 framework. Through the integration, you can securely and seamlessly generate UID2s for your data without making direct calls to the UID2 operator or handling sensitive client ID and secret key values.
This service allows you to map DII (email addresses or phone numbers) to raw UID2s swiftly and securely.
If you're not currently part of the UID2 ecosystem, go to the Request Access to UID2 page.
For a video presentation about integration with UID2 by using AWS Entity Resolution, and a demo, see Getting Started with AWS Entity Resolution Integration with Unified ID 2.0 on YouTube.
For a summary of all integration options and steps for advertisers and data providers, see Advertiser/data provider integration overview.
Functionality
The following table summarizes the functionality available with the AWS Entity Resolution integration.
| Encrypt raw UID2 to UID2 token | Decrypt UID2 token to raw UID2 | Generate UID2 token from DII | Refresh UID2 token | Map DII to raw UID2s |
|---|---|---|---|---|
| No | No | No | No | Yes |
Integration summary
The following table summarizes the steps to integrate with UID2 using AWS Entity Resolution.
| Step/link | Details |
|---|---|
| Initial setup steps | Create UID2 account, create AWS account, and link them: |
| Configure AWS account | Set up IAM users, data tables, and schema mapping for your data. |
| Create a matching workflow | Create the workflow for matching your data, including input location, the matching technique to be applied, and output location. |
| Run the matching workflow | Process the input data to create raw UID2s. |
Workflow diagram
The following diagram illustrates the end-to-end UID2 process, from signing up for the service, through the configuration steps, to receiving the raw UID2s.
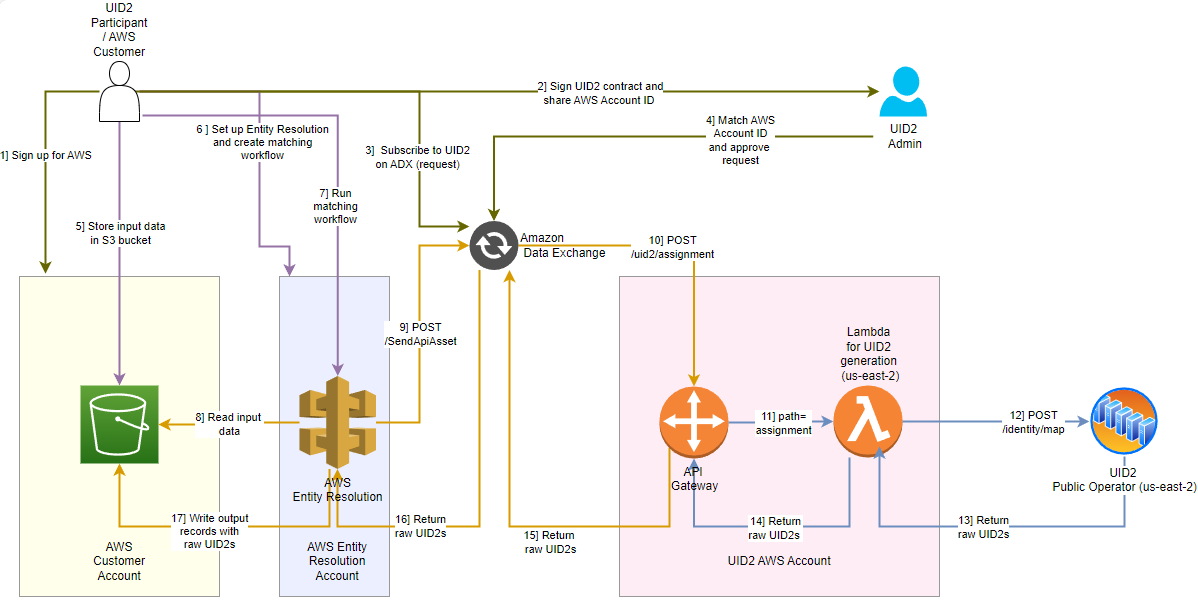
The following table shows the sequence of steps shown in the diagram.
| Step | Actor | Action |
|---|---|---|
| 1 | Participant | Signs up for AWS. |
| 2 | Participant | Signs UID2 contract and shares AWS Account ID with UID2 contact. |
| 3 | Participant | Subscribes to UID2 on the Amazon Data Exchange. |
| 4 | UID2 Administrator | Matches the AWS Account ID provided in Step 2 with the signup request received in Step 3 and approves the request. |
| 5 | Participant | Stores input data in an Amazon S3 bucket. |
| 6 | Participant | Sets up Entity Resolution and creates a matching workflow. |
| 7 | Participant | Runs the matching workflow. |
| 8 | AWS Entity Resolution | Reads input data from the S3 bucket. |
| 9 | AWS Entity Resolution | Sends the input data to the Amazon Data Exchange using POST /SendApiAsset. |
| 10 | Amazon Data Exchange | Sends the data to the API Gateway using POST /uid2/assignment. |
| 11 | API Gateway | Sends the data to Lambda using path=assignment. |
| 12 | Lambda for UID2 generation | Sends the data to the UID2 Public Operator for conversion to raw UID2 using POST /identity/map. |
| 13 | UID2 Public Operator | Returns raw UID2s to Lambda for UID2 generation. |
| 14 | Lambda for UID2 generation | Returns raw UID2s to the API Gateway. |
| 15 | API Gateway | Returns raw UID2s to the Amazon Data Exchange. |
| 16 | Amazon Data Exchange | Returns raw UID2s to AWS Entity Resolution. |
| 17 | AWS Entity Resolution | Writes the output records to the S3 bucket including the raw UID2s. |
Preparing DII for processing
It's critical that the input data, which you are converting to UID2, is in an acceptable format. If it isn't, you won't get the expected results. For example, you must normalize phone numbers to include the country code, as explained in Phone number normalization.
For details, see Preparing emails and phone numbers for processing.
To validate the full token generation pipeline end to end, confirming that tokens generated from your normalized, hashed, and encoded values are correct, use the UID2 Token Validator.
Initial setup steps
The following are the initial steps for setting up your UID2 integration in AWS Entity Resolution:
Create AWS account
Sign up for an AWS account, or use an existing one.
For details, see Getting started: Are you a first-time AWS user? in the AWS documentation.
Create UID2 account
Ask your UID2 contact to register you as a UID2 participant. If you're not sure who to ask, see Contact info.
Send your UID2 contact the AWS account ID that you'll use for your UID2 integration on Entity Resolution.
Subscribe to UID2 on AWS data exchange
Visit the Unified ID 2.0 Identity Resolution page on the AWS Data Exchange and click Continue to Subscribe.

On receipt of your subscription request, the UID2 team does the following:
- Reviews your subscription request.
- Matches your request with the AWS account ID that you sent in Create UID2 account.
- Approves the request.
Configure AWS account
UID2 participants store their data in AWS, in an S3 bucket, and integrate with AWS Entity Resolution. The basic steps, once you've created the AWS account (see Create AWS account) are as follows.
For detailed instructions, see Setting up AWS Entity Resolution in the AWS documentation.
-
In AWS Entity Resolution, each input data table contains source records with consumer identifiers. For UID2, the identifier can be either email address or phone number, but there must be only one identifier for each record. The identifier can be matched with other source records that you provide. Each record must have a Unique ID which is defined as the primary key in the schema mapping you create in Step 4. Follow these steps:
- Save your input data table in a supported data format.
- Upload your input data table to Amazon S3.
- Create an AWS Glue table.
-
Create an IAM role for a console user.
-
Create a workflow job role for AWS Entity Resolution.
-
Create schema mapping for the data: see Creating a schema mapping in the AWS documentation.
Create a matching workflow
When your initial account creation and setup are done, the next step is to create a matching workflow for your data.
The following steps are a summary of actions you'll take in the AWS Entity Resolution user interface. For additional details and instructions, see Creating a matching workflow with UID 2.0 in the AWS Entity Resolution documentation.
UID2 supports both email and phone number for UID2 generation. However, in AWS Entity Resolution, if both values are present in the schema mapping, the workflow duplicates each record in the output. One record uses the email for UID2 generation and the second record uses phone number. If your data includes a mix of emails and phone numbers and you don't want this duplication of records in the output, the best approach is to create a separate workflow for each, with separate schema mappings. In this scenario, go through the following steps twice—create one workflow for emails and a separate one for phone numbers.
To create the matching workflow, first sign in to the AWS Management console, open the AWS Entity Resolution page, and choose Workflows > Matching workflows > Create matching workflow. Then, complete the following steps for your matching workflow.
-
Specify the following details for the matching workflow:
-
Name: This value is required. We recommend a short, clear, intuitive name. For example, with your own company name:
CompanyName_UID2_Daily_Matching. -
Description: An optional description for the matching workflow.
-
Data input: The source for your data in AWS. From the drop-down list, select an AWS Glue database, then the AWS Glue table, and then the schema mapping. You can specify more than one data input. In the following example, email is the only type of data input:
UniqueId Name Email Date of Birth 0001 Test 1 test1@uidapi.com 1/1/90 0002 Test 2 test2@gmail.com 1/2/78 noteIf you have both email and phone numbers in the same record, the workflow duplicates each record in the output. If you don't want this, the best approach is to create a separate workflow for each. See details earlier in this section.
-
Service access: Grant permissions to Entity Resolution to access the specified data in AWS Glue and to call AWS Data Exchange on your behalf. We highly recommend that you select "Create and use a new service role" and let the workflow create a new role with all the required permissions. If you're using an existing service role, make sure that it is authorized to call AWS Data Exchange by adding the following permission:
{
"Version": "2012-10-17",
"Statement": [
    {
        "Effect": "Allow",
        "Sid": "DataExchangePermissions",
        "Action": "dataexchange:SendApiAsset",
        "Resource": [
            "<Asset ARN>"
        ]
      }
  ]
}
The Asset ARN is available on the AWS Data Exchange console at "AWS Data Exchange" > "Entitled data" > "Unified ID 2.0 Identity Resolution" > "Data set: UnifiedID-2.0" > "Revision: Date" > "Asset: venice-api-gateway-prod"
-
Decryption Key: If the input data is encrypted, you must also specify the AWS Key Management Service (KMS) key for decryption.
-
-
Choose the matching technique:
-
Under Matching method, choose the Partner services option.
-
Then, under Partner services, choose Unified ID2.0.
-
Click Next.
If you completed the earlier step, see Subscribe to UID2 on AWS data exchange, you'll see an Approved message.
-
-
Define the data output:
-
For Data Output Destination, specify the URI of the S3 bucket that you want to use for your output data. Select the data format: Normalized or Original.
Normalizedis the default, so that data inputs are normalized before matching.Your data is encrypted by default with a key that AWS owns and manages for you. To specify a different key, customize your encryption settings.
-
Select the input fields that you want to exclude from the output, and the fields that you want to hash in the output data, as shown in the following example.
UniqueId Name Email Date of Birth UID2_identifier UID2_advertising_id UID2_bucket_id 0001 Test 1 test1@uidapi.com 1/1/90 test1@uidapi.com Q4A5ZBuBCYfuV3Wd8Fdsx2+i33v7jyFcQbcMG/LH4eM= ad1ANEmVZ 0002 Test 2 test2@gmail.com 1/2/78 test2@gmail.com kds8hgBuBCYfuV3Wd8Fdsx2+i33v7jyFcQbcMG/jgksuh= kd9ANE98d
-
-
Review and Create: Review all the details of the matching workflow. When you're satisfied with the values, click Create.
The matching workflow is created, and you'll see a confirmation message.
Run the matching workflow
Follow these steps to run the matching workflow and view the results.
For details, see Running and managing matching workflows in the AWS Entity Resolution documentation.
-
Sign in to the AWS Management console, open the AWS Entity Resolution page, and choose Workflows > Matching workflows.
-
Choose the matching workflow that you want to run.
-
On the Matching workflows details page, in the upper right corner, choose Run.
The matching workflow runs. When it is done, you'll see a status message of Completed.
-
To view the results, go to the Data output tab and then select your Amazon S3 location.